CocoaPods 私有库

整理一下CocoaPods 私有库相关使用问题

一.创建Pod项目工程文件

  • 1.在GitLab上创建XXCommonSDK项目,cd进入到要创建项目的目录,然后终端执行以下命令创建工程:
1
# pod lib create XXCommonSDK

接着在控制台就会输出以下几个问题让你来回答:

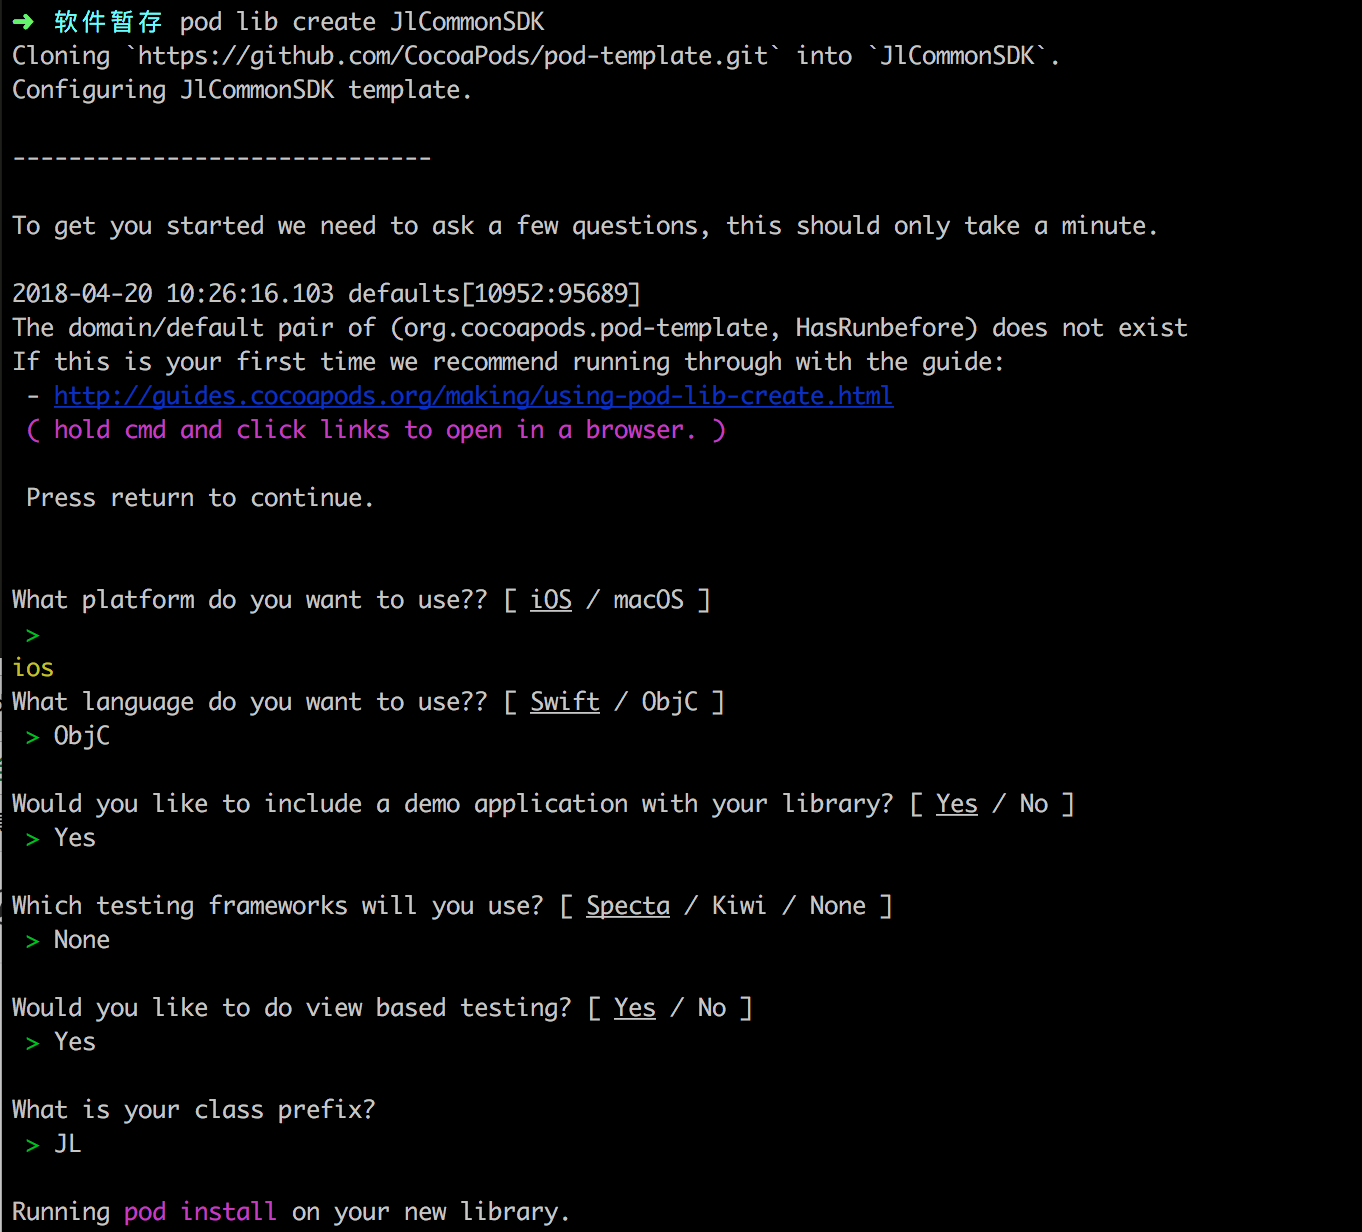
完成以上的问题后控制台会输出以下信息 ,然后自动打开所创建的项目

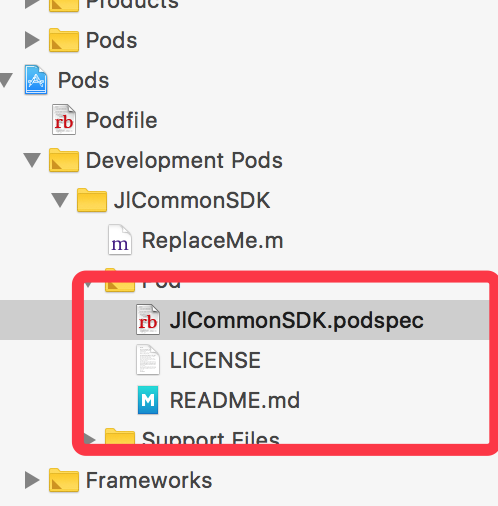
  • 2.在以下截图的目录下添加你的实现代码,里面自带一个ReplaceMe.m文件,直接删除它就好了,添加你自己的.h.m实现文件 ,如下图:

  • 3.修改Podfile文件,打开工程目录下Example目录的Podfile文件,修改如下提交仓库到 git:
1
2
3
4
5
6
git add .
git commit -s -m 'init'
git remote add origin http://xxxx:user/XXCommonSDK_iOS.git #添加远端仓库
git push origin master #提交到远端仓库
git tag -m "first release" 0.1.0
git push --tags #推送tag到远端仓库

因为podspec文件中获取Git版本控制的项目还需要tag号,所以我们要打上一个tag,

  • 4.编辑podspec,http://xxxx.xxx.xxx需要替换为实际的地址,官方文档
1
2
3
4
5
6
7
8
9
10
11
12
13
14
15
16
17
18
19
20
21
22
23
24
25
26
27
28
29
30
31
32
33
34
Pod::Spec.new do |s|
s.name = 'JlCommonSDK' #名称
s.version = '0.1.0' #版本号
s.summary = 'A short description of JlCommonSDK.' #简短介绍,下面是详细介绍

# This description is used to generate tags and improve search results.
# * Think: What does it do? Why did you write it? What is the focus?
# * Try to keep it short, snappy and to the point.
# * Write the description between the DESC delimiters below.
# * Finally, don't worry about the indent, CocoaPods strips it!

s.description = <<-DESC
TODO: Add long description of the pod here.
DESC

s.homepage = 'http://xxxx.xxx.xxx'
# s.screenshots = 'www.example.com/screenshots_1', 'www.example.com/screenshots_2'
s.license = { :type => 'MIT', :file => 'LICENSE' }
s.author = { 'sukeyang => '410900345@qq.com' }
s.source = { :git => 'http://xxxx.xxx.xxx', :tag => s.version.to_s }
# s.social_media_url = 'https://twitter.com/<TWITTER_USERNAME>'

s.ios.deployment_target = '8.0'

s.source_files = 'XXCommonSDK/Classes/**/*'

# s.resource_bundles = {
# 'JlCommonSDK' => ['JlCommonSDK/Assets/*.png']
# }

# s.public_header_files = 'Pod/Classes/**/*.h'
# s.frameworks = 'UIKit', 'MapKit'
# s.dependency 'AFNetworking', '~> 2.3'
end
  • 5.验证文件podspec正确性, podspec里面的描述信息,是我们可以获取到正确的文件,这个后面会提交到私有库索引的列表里面.
1
2
3
pod lib lint
//或者
pod spec lint --use-libraries --allow-warnings --verbose //忽略警告
1
XXCommonSDK passed validation.

警告可以进行忽略,下面的

1
[!] XXCommonSDK did not pass validation, due to 1 warning (but you can use `--allow-warnings` to ignore it).

向Spec Repo提交podspec

  • 1.可以查看 ~/.cocoapods/repos 目录下的文件,里面有每个三方库文件的对应版本podspec

在gitlab上另外建立一个SukSpecs项目(管理所有的pod spec文件),

1
pod repo add SukSpecs git@xxx:xxx/SukSpecs.git
  • 2.添加成功之后可以,进行查看pod的三方库下载的查找索引地址,
1
pod repo
1
2
3
4
5
6
7
8
9
master
- Type: git (master)
- URL: https://github.com/CocoaPods/Specs.git
- Path: /Users/hl/.cocoapods/repos/master

SukSpecs
- Type: git (master)
- URL: git@xxx/iOSPGSDK.git
- Path: /Users/hl/.cocoapods/repos/SukSpecs
  • 3.进入到上面第五步的pod 目录找到XXCommonSDK.podspec目录,提交到我们自己的私有仓库
1
pod repo push SukSpecs XXCommonSDK.podspec

可以到 ~/.cocoapods/repos/SukSpecs 目录下的文件查看,这个目录也是一个 git 文件夹,可以用git图像页面工具进行修改管理SourceTree.

  • 4.使用制作好的Pod

我们就可以在正式项目中使用这个私有的Pod了只需要在项目的Podfile里增加以下一行代码即可

1
pod 'XXCommonSDK', '~> 0.1.0'

升级维护私有库

  • 1.在Pod项目工程文件,修改添加代码,进行提交,一定要打tag
1
2
$ git tag -m "first release" 0.1.0
$ git push --tags #推送tag到远端仓库
  • 2.提交podspec到我们的私有仓库, podspec里面的版本号s.version 和上面的Pod项目工程文件的 tag是对应的
1
pod repo push SukSpecs XXCommonSDK.podspec
  • 3.在式项目中使用这个私有的Pod的工程目录下
1
pod update

参考地址

参考地址2